Introduction
In this tutorial, you will be guided to create your first Angular Application. You will learn everything starting from the commands responsible for the creation of the Angular application until understand the generated folders and files.
Please, do not miss any part of the article.

How to Create a new Angular project
Check Angular CLI installation and version
In the last article, we learned how to install Angular CLI. Before we start the steps guiding the creation of a new Angular project, we must recheck if Angular CLI installation.
We can type this command in your command prompt :
ng --versionand if you are working with Angular CLI 14, you should use this one :
ng versionYou should see an output similar to the following image indicating the installed version of Angular CLI.

and if it’s not the case ( ng –version does not show the installed version of Angular) try to reinstall Angular CLI (take a look at our last article), or verify that ng is well added as an environment variable.
Create a new Angular project
We pass now to the primordial step which is Angular project creation. Despite its importance, this step is considered too simple because it is made with one single command ng new projectName .
Example :
ng new first-projectWith this command, we are creating a new Angular project called first-project, and the following questions will appear in your terminal (command prompt)
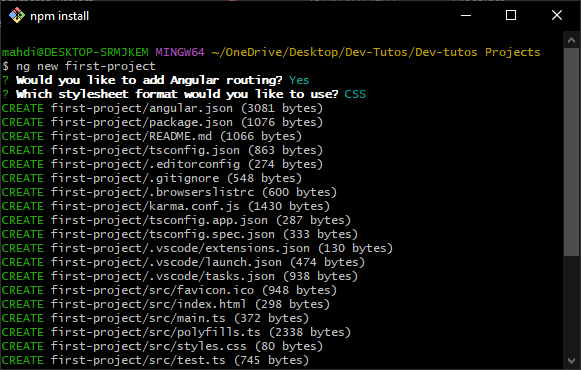
The first question is :
Would you like to add Angular routing?
If you want to have a separate routing Module, then the answer should be YES, and if it’s not the case you can type NO.
The second question is :
Which stylesheet format would you like to use?
You can choose the format of the project style, you can choose between CSS, SCSS, SASS, LESS, Stylus.
Personally, I always choose either CSS or SCSS, and it depends on the context of the project.
Create a new Angular project with options
To avoid the questions that we’ve faced above while creating an Angular Project, we can use some options provided by Angular CLI. You can check this link https://angular.io/cli/new.
But at this level, we will be focused on the options that prevent us from getting the two questions above which are –style and –routing :
- –style : is the option that we can use to provide a specific styling format in the project. this option can take one of these values: css | scss | sass | less. The example below shows how to use the –style option :
ng new first-project --style=scss- –routing : is the option that we use to tell Angular if we want a Routing Module or No. The values that this option can take are true or false.
ng new first-project --routing=trueWe can combine more than one option like the example below:
ng new first-project --style=scss --routing=trueHow to run an Angular Project?
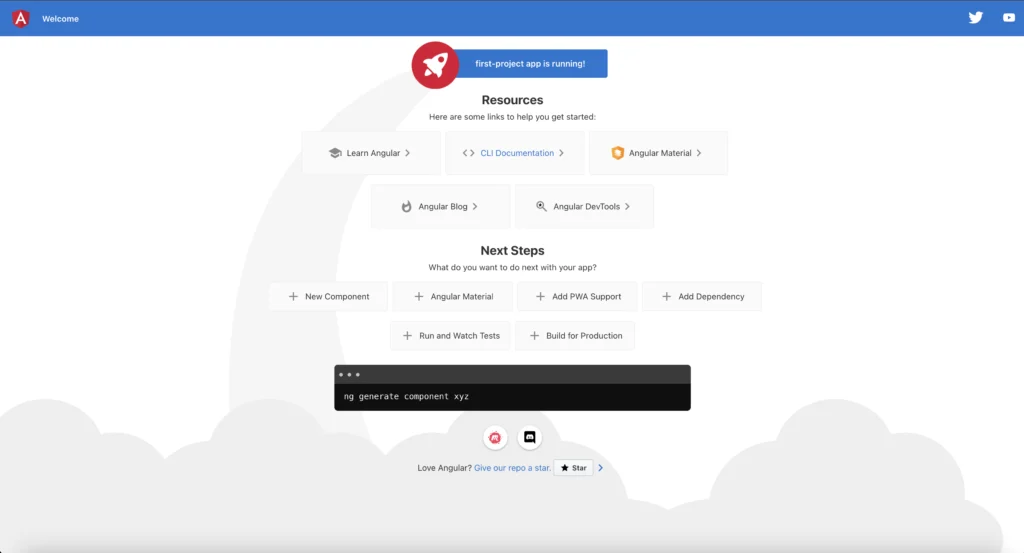
Now we can see that our first Angular project was created.

The question now is how to run this Project.
We will use this command line inside the project (be careful you must be directly under the project folder):
ng serve This command will compile the project and call the Webpack Server to bundle Angular files and modules and watch its updates.
The project is now running on 4200 ( we can change the port by the –port option, check this to get more options https://angular.io/cli/serve )
The next step is to type http://localhost:4200/ on your browser, and you will see a page like this.
We can also use this command to open the angular project directly in the browser without the need to type anything in the browser URL :
ng serve --open Or simply :
ng serve --oThe Angular Project Structure
Let’s take a look now at the generated project structure (folder and files) and the role of each folder and file.
Our project has the following structure.
├── .angular
│   ├── cache
├── .vscode
├── node_modules
├── src
│   ├── app
│   │   ├── app-routing.module.ts
│   │   ├── app.component.css
│   │   ├── app.component.html
│   │   ├── app.component.spec.ts
│   │   ├── app.component.ts
│   │   ├── app.module.ts
│   ├── assets
│   │   ├── .gitkeep
│   ├── environments
│   │   ├── environment.prod.ts
│   │   ├── environment.ts
│   ├── favicon.ico
│   ├── index.html
│   ├── main.ts
│   ├── polyfills.ts
│   ├── styles.css
│   ├── test.ts
├── .editorconfig
├── .gitignore
├── angular.json
├── browserslist
├── karma.conf.js
├── package-lock.json
├── package.json
├── README.md
├── tsconfig.app.json
├── tsconfig.json
├── tsconfig.spec.json
We will explain each of our project’s elements one by one. So be focused.
What is the .angular/cache folder?
The Angular Cache is a mechanism provided by Angular CLI that helps in caching some operations in the disk to boost the build performance.
We will take this example, if we are running a new build, the system will be based on the last build operations and will reuse the unchangeable processes which will reduce the time taken to finish the build.
Remember that Angular caching is provided by default in local environments, and it is added automatically to the .gitignore file (which will talk about a little bit later).
.vscode folder (Why .vscode folder is generated in Angular ?)
Once we open our project with the Visual Studio Code editor, this folder will be generated holding our VsCode configuration, added plugins, VsCode Debugging, etc …
This folder is added also by default to the .gitignore file.
What is Node Modules folder In Angular Project?
In the last Article, we discovered that we need Node js and NPM Installation, and Hence come to the use of those two technologies.
The Node Modules folder is the directory that contains all the needed libraries to work or to execute certain functionality.
By default, when we create an Angular Project with ng new, Angular CLI will install the required libraries and modules via Node Package Manager (NPM).
Angular CLI will know what to install from the package.json file. It will download the dependencies and the devDependencies one by one. ( We will talk about that in detail later )
The Angular src folder (src folder structure)
The src folder is the folder where we will develop and write code. It contains the app folder, assets folder, environments folder, favicon file, index file, main ts file, polyfills file, styles CSS file, and the test ts file.
Angular App folder
The Angular src/app folder is the folder created by Angular CLI that includes the root Module, the root Component, and the root Routing Module.
Here we emitted some new terms like Modules and Components. Don’t worry, We will detail everything later in specific articles to go in-depth with every term.
But now, let’s continue explaining the content of the app folder :
The Angular Root Component
We won’t explain in detail What a component in Angular is. But, at this level, we will be limited to the elements constructing An Angular Component.
An Angular Component is the combination of four generated files :
- HTML File: app.component.html
- Typescript File: app.component.ts
- Typescript testing File: app.component.spec.ts
- Styling file: app.component.css
We called it the root component because it is our main entry component created by Angular CLI.
app.component.html file
The app component HTML file represents the template Layout of the root component of our Application.
When we open the code of this file, we can easily detect that it is the code displayed on the home page of http://localhost:4200
app.component.ts file
It’s the most important file in the component. It will handle the logic side of the application.
Mainly the generated app.component.ts file should be like this :
import { Component } from '@angular/core';

@Component({
  selector: 'app-root',
  templateUrl: './app.component.html',
  styleUrls: ['./app.component.scss']
})
export class AppComponent {
  title = 'first-project';
}
We can easily note that the code is separated into three main parts:
- import statement: it’s used to import libraries, other classes, enums, services … into our class component.
- @Component Decorator: in this part, we provide some extra information about the component. the @Component decorator is imported from the Angular Core. Inside the decorator detail, we have three other pieces :
- selector: it’s the tag of the component. We can call this component in another one using this selector.
- templateUrl: it’s how Angular knows the linked template file. By default, the attribute will have the name of the HTML generated file. We can also add some HTML code without mentioning the file name ( inline HTML )
- styleUrls: it’s the styling configuration part, we can specify the (CSS or SCSS) file name and we can write CSS code inline too.
- export class: Here we’re defining the class itself. Inside the class, we will have the logic part. We will have methods and variables. The export keyword indicates that the class can be used in any other part of the project ( we can import it ).
app.component.spec.ts file
It’s the file generated automatically by Angular to run unit tests for the Project’s source files. We can skip generating those files from the project’s creation by applying the –skip-tests option. You may apply it for the component creation or just by adding "skipTests":true it to your angular.json file.
ng new first-project --skip-tests=trueapp.component.css file
The extension here will depend on how you configured your styling project. Here, we can write the styling code related to the app component.
What is meant by root module in Angular? app.module.ts
In Angular, we can organize our code into separate modules depending on the functionalities. We can consider modules in Angular as small independent projects. But, In order to guarantee the orchestration and the definition of each of these modules, we need a parent or a root module that holds the definition of each child Module. Also, We can need some other additional modules ( that we don’t create ourselves)
import { NgModule } from '@angular/core';
import { BrowserModule } from '@angular/platform-browser';

import { AppRoutingModule } from './app-routing.module';
import { AppComponent } from './app.component';

@NgModule({
  declarations: [
    AppComponent
  ],
  imports: [
    BrowserModule,
    AppRoutingModule
  ],
  providers: [],
  bootstrap: [AppComponent]
})
export class AppModule { }
Now, we will discover the different parts constituting an Angular Module.
- import statement: it’s the same as the import statement in the Component class. But, there is no problem with getting a quick reminder. With the import statements at the top of the file, we are able to call and import all the elements that we need in the module ( services, other Modules, Components … )
- @NgModule decorator: It’s a ready built-in decorator that we should import from the Angular core. In this part, we are providing some metadata about the Module. The @NgModule decorator is mandatory. We have four fields related to the @NgModule.
- declarations: It’s an array containing the components included in the module.
- imports: it will contain the imported Module that we will need in our Module. In the example above we are importing the BrowserModule which contains plenty of directives and pipes, and the AppRouting Module responsible for routing our application.
- providers: in this field, we must define the services that we create.
- bootstrap: in this field, we must invoke or put the component(s) that we want to be loaded first.
- export class: Angular Modules are simple classes that we should expect to be used anywhere in the project with the keyword export. Generally, we don’t write any code inside the module class.
What is the app route in Angular? app-routing.module.ts
The app routing module is the part that assures the navigation or the routing between our different pages ( screens ). We can have multiple routing Modules ( a routing Module per Module for example).
Whereas having at least one module is mandatory, the routing module is optional.
Let’s take a look at our app-routing Module file.
import { NgModule } from '@angular/core';
import { RouterModule, Routes } from '@angular/router';

const routes: Routes = [];

@NgModule({
  imports: [RouterModule.forRoot(routes)],
  exports: [RouterModule]
})
export class AppRoutingModule { }
As it is a Module it has a structure similar to the root Module or any other Module. In the routes constant, we should put and indicate the route related to every component. We will dive into this with more examples and cases later.
What is the use of the assets folder in Angular?
The assets folder holds the static files like images, icons, and JSON files… The files included in this folder can be accessed by the browser via HTTP requests. The assets folder is created automatically and configured in the angular JSON file.
As you see, the assets attribute accepts an array of values. Yes, your thoughts are true: you can create your own assets folder. You need just to declare it in the assets attribute.
By default, the assets folder will contain a .gitkeep file.
What is a .gitkeep file?
.gitkeep is simply a file that git users put in empty directories or folders in order to be tracked in the next commit.
.gitkeep is considered the opposite of .gitignore, and it’s not related to a specific technology or programming language.
environments folder
environments is a folder that, by default, contains two files environment.ts and environment.prod.ts.
the goal of this folder and the files within it is to define some separation between the development environment and the production mode.
We can, for example, declare some variables and their values change with the mode ( development and production).
You can take a look at the two files :
environment.prod.ts
//environment.prod.ts

export const environment = {
  production: true
};
environment.ts
//environement.ts

// This file can be replaced during build by using the `fileReplacements` array.
// `ng build` replaces `environment.ts` with `environment.prod.ts`.
// The list of file replacements can be found in `angular.json`.

export const environment = {
  production: false
};

/*
 * For easier debugging in development mode, you can import the following file
 * to ignore zone related error stack frames such as `zone.run`, `zoneDelegate.invokeTask`.
 *
 * This import should be commented out in production mode because it will have a negative impact
 * on performance if an error is thrown.
 */
// import 'zone.js/plugins/zone-error';  // Included with Angular CLI.
We will come back to this later with more details and examples.
favicon.ico
The favicon is the default small icon appearing next to the project title in Angular’s tab browser.
index.html
index.html is the first entry point view to our application.
<!doctype html>
<html lang="en">
<head>
  <meta charset="utf-8">
  <title>FirstProject</title>
  <base href="/">
  <meta name="viewport" content="width=device-width, initial-scale=1">
  <link rel="icon" type="image/x-icon" href="favicon.ico">
</head>
<body>
  <app-root></app-root>
</body>
</html>
If you read the whole article, you can easily remark that we have a selector app-root. Hence, we are calling the root component via his selector. We are loading, in that way, the root component.
Here in the index.html, we are providing some meta information title of the project, the favicon, and the component to load in the body.
What is main.ts in Angular? main.ts file
main.ts is the first file that gets executed whenever we run our Angular application. It is responsible for bootstrapping the Parent Module and its components.
import { enableProdMode } from '@angular/core';
import { platformBrowserDynamic } from '@angular/platform-browser-dynamic';

import { AppModule } from './app/app.module';
import { environment } from './environments/environment';

if (environment.production) {
  enableProdMode();
}

platformBrowserDynamic().bootstrapModule(AppModule)
  .catch(err => console.error(err));
We said that the index.html is the entry point of our views in other words it is responsible for displaying the first content on the screen via the selector.
But, How can Angular know the selector and its correspondence?
Well, the answer is evidentially main.ts. When it bootstraps the AppModule, The AppModule will be in charge of defining its own components ( AppComponent).
In the opposite case ( AppModule Module is not bootstrapped ), When trying to open http://localhost:4200, an error in the console appears telling that app-root is not a known element.
What is Polyfills in Angular? Polyfills.ts
In order to make the Angular project run in different browsers even in IE and Firefox, Angular CLI added a few lines of code to ensure a good configuration and the best environment setup.
The code provided in Polyfills, and its imported statements and files work behind the scenes.
styles.css
In this file, we can introduce some global styles that can be used anywhere in the project.
The default generated styles. (csss | scss …) is empty.
test.ts
test.ts is the entry test file. It contains some configurations provided by the Karma framework.
It loads all the test files and modules using a regex expression and initializes the Angular testing environment.
Typically, we do not need to change anything in this file code.
// This file is required by karma.conf.js and loads recursively all the .spec and framework files

import 'zone.js/testing';
import { getTestBed } from '@angular/core/testing';
import {
  BrowserDynamicTestingModule,
  platformBrowserDynamicTesting
} from '@angular/platform-browser-dynamic/testing';

declare const require: {
  context(path: string, deep?: boolean, filter?: RegExp): {
    <T>(id: string): T;
    keys(): string[];
  };
};

// First, initialize the Angular testing environment.
getTestBed().initTestEnvironment(
  BrowserDynamicTestingModule,
  platformBrowserDynamicTesting(),
);

// Then we find all the tests.
const context = require.context('./', true, /\.spec\.ts$/);
// And load the modules.
context.keys().map(context);
.editorconfig file vscode
This is not related to Angular configuration. It’s a file generated by the VsCode editor to configure some settings for the file’s code.
# Editor configuration, see https://editorconfig.org
root = true

[*]
charset = utf-8
indent_style = space
indent_size = 2
insert_final_newline = true
trim_trailing_whitespace = true

[*.ts]
quote_type = single

[*.md]
max_line_length = off
trim_trailing_whitespace = false
What is a .gitignore file in Angular? .gitignore
.gitignore is a file created automatically when we create an Angular Project with the Angular CLI tool.
the use of this file is to list the folders and the files that we don’t want to commit to the Git repository.
# See http://help.github.com/ignore-files/ for more about ignoring files.

# Compiled output
/dist
/tmp
/out-tsc
/bazel-out

# Node
/node_modules
npm-debug.log
yarn-error.log

# IDEs and editors
.idea/
.project
.classpath
.c9/
*.launch
.settings/
*.sublime-workspace

# Visual Studio Code
.vscode/*
!.vscode/settings.json
!.vscode/tasks.json
!.vscode/launch.json
!.vscode/extensions.json
.history/*

# Miscellaneous
/.angular/cache
.sass-cache/
/connect.lock
/coverage
/libpeerconnection.log
testem.log
/typings

# System files
.DS_Store
Thumbs.db
What is angular json file ? angular.json
angular.json is a file holding some configurations about different Angular modes ( build, test, production, development … )
We won’t go fully into the details of this file, But, we should emphasize on its importance. We can modify this file configuration when necessary.
{
  "$schema": "./node_modules/@angular/cli/lib/config/schema.json",
  "cli": {
    "analytics": false
  },
  "version": 1,
  "newProjectRoot": "projects",
  "projects": {
    "first-project": {
      "projectType": "application",
      "schematics": {
        "@schematics/angular:component": {
          "style": "scss"
        },
        "@schematics/angular:application": {
          "strict": true
        }
      },
      "root": "",
      "sourceRoot": "src",
      "prefix": "app",
      "architect": {
        "build": {
          "builder": "@angular-devkit/build-angular:browser",
          "options": {
            "outputPath": "dist/first-project",
            "index": "src/index.html",
            "main": "src/main.ts",
            "polyfills": "src/polyfills.ts",
            "tsConfig": "tsconfig.app.json",
            "inlineStyleLanguage": "scss",
            "assets": [
              "src/favicon.ico",
              "src/assets"
            ],
            "styles": [
              "src/styles.scss"
            ],
            "scripts": []
          },
          "configurations": {
            "production": {
              "budgets": [
                {
                  "type": "initial",
                  "maximumWarning": "500kb",
                  "maximumError": "1mb"
                },
                {
                  "type": "anyComponentStyle",
                  "maximumWarning": "2kb",
                  "maximumError": "4kb"
                }
              ],
              "fileReplacements": [
                {
                  "replace": "src/environments/environment.ts",
                  "with": "src/environments/environment.prod.ts"
                }
              ],
              "outputHashing": "all"
            },
            "development": {
              "buildOptimizer": false,
              "optimization": false,
              "vendorChunk": true,
              "extractLicenses": false,
              "sourceMap": true,
              "namedChunks": true
            }
          },
          "defaultConfiguration": "production"
        },
        "serve": {
          "builder": "@angular-devkit/build-angular:dev-server",
          "configurations": {
            "production": {
              "browserTarget": "first-project:build:production"
            },
            "development": {
              "browserTarget": "first-project:build:development"
            }
          },
          "defaultConfiguration": "development"
        },
        "extract-i18n": {
          "builder": "@angular-devkit/build-angular:extract-i18n",
          "options": {
            "browserTarget": "first-project:build"
          }
        },
        "test": {
          "builder": "@angular-devkit/build-angular:karma",
          "options": {
            "main": "src/test.ts",
            "polyfills": "src/polyfills.ts",
            "tsConfig": "tsconfig.spec.json",
            "karmaConfig": "karma.conf.js",
            "inlineStyleLanguage": "scss",
            "assets": [
              "src/favicon.ico",
              "src/assets"
            ],
            "styles": [
              "src/styles.scss"
            ],
            "scripts": []
          }
        }
      }
    }
  },
  "defaultProject": "first-project"
}
Karma.conf.js
Karma is a framework for testing Angular applications. And like every framework, it has its specific configuration.
The configuration might be written in JavaScript, CoffeeScript, or typescript. It specifies some necessary config like the port, the default browser, and so on…
// Karma configuration file, see link for more information
// https://karma-runner.github.io/1.0/config/configuration-file.html

module.exports = function (config) {
  config.set({
    basePath: '',
    frameworks: ['jasmine', '@angular-devkit/build-angular'],
    plugins: [
      require('karma-jasmine'),
      require('karma-chrome-launcher'),
      require('karma-jasmine-html-reporter'),
      require('karma-coverage'),
      require('@angular-devkit/build-angular/plugins/karma')
    ],
    client: {
      jasmine: {
        // you can add configuration options for Jasmine here
        // the possible options are listed at https://jasmine.github.io/api/edge/Configuration.html
        // for example, you can disable the random execution with `random: false`
        // or set a specific seed with `seed: 4321`
      },
      clearContext: false // leave Jasmine Spec Runner output visible in browser
    },
    jasmineHtmlReporter: {
      suppressAll: true // removes the duplicated traces
    },
    coverageReporter: {
      dir: require('path').join(__dirname, './coverage/first-project'),
      subdir: '.',
      reporters: [
        { type: 'html' },
        { type: 'text-summary' }
      ]
    },
    reporters: ['progress', 'kjhtml'],
    port: 9876,
    colors: true,
    logLevel: config.LOG_INFO,
    autoWatch: true,
    browsers: ['Chrome'],
    singleRun: false,
    restartOnFileChange: true
  });
};
We will provide in the next lectures a full tutorial about testing in Angular with Jasmine and Karma frameworks.
package.json
package.json is a JSON file holding metadata about our project like needed dependencies, npm or yarn scripts, and project version …
package.json is not related to only Angular. It exists in every javascript-Node-based framework.
{
  "name": "first-project",
  "version": "0.0.0",
  "scripts": {
    "ng": "ng",
    "start": "ng serve",
    "build": "ng build",
    "watch": "ng build --watch --configuration development",
    "test": "ng test"
  },
  "private": true,
  "dependencies": {
    "@angular/animations": "~13.3.0",
    "@angular/common": "~13.3.0",
    "@angular/compiler": "~13.3.0",
    "@angular/core": "~13.3.0",
    "@angular/forms": "~13.3.0",
    "@angular/platform-browser": "~13.3.0",
    "@angular/platform-browser-dynamic": "~13.3.0",
    "@angular/router": "~13.3.0",
    "rxjs": "~7.5.0",
    "tslib": "^2.3.0",
    "zone.js": "~0.11.4"
  },
  "devDependencies": {
    "@angular-devkit/build-angular": "~13.3.9",
    "@angular/cli": "~13.3.9",
    "@angular/compiler-cli": "~13.3.0",
    "@types/jasmine": "~3.10.0",
    "@types/node": "^12.11.1",
    "jasmine-core": "~4.0.0",
    "karma": "~6.3.0",
    "karma-chrome-launcher": "~3.1.0",
    "karma-coverage": "~2.1.0",
    "karma-jasmine": "~4.0.0",
    "karma-jasmine-html-reporter": "~1.7.0",
    "typescript": "~4.6.2"
  }
}
package-lock.json
package-lock.json is a file generated or modified after any update on the package.json or the node-modules tree.
Generally, we won’t modify package-lock.json. It is used for tracking project versions and dependencies.
README.md
This file also is not specific to Angular projects. We can refer to my-great-learning definition’s of readme as it is a text file providing a description and a manual to use the project.
The generated readme.md is not an empty file. Angular CLI has a default readme content for its Angular projects that we can change whenever we want.
# FirstProject

This project was generated with [Angular CLI](https://github.com/angular/angular-cli) version 13.3.9.

## Development server

Run `ng serve` for a dev server. Navigate to `http://localhost:4200/`. The application will automatically reload if you change any of the source files.

## Code scaffolding

Run `ng generate component component-name` to generate a new component. You can also use `ng generate directive|pipe|service|class|guard|interface|enum|module`.

## Build

Run `ng build` to build the project. The build artifacts will be stored in the `dist/` directory.

## Running unit tests

Run `ng test` to execute the unit tests via [Karma](https://karma-runner.github.io).

## Running end-to-end tests

Run `ng e2e` to execute the end-to-end tests via a platform of your choice. To use this command, you need to first add a package that implements end-to-end testing capabilities.

## Further help

To get more help on the Angular CLI use `ng help` or go check out the [Angular CLI Overview and Command Reference](https://angular.io/cli) page.
tsconfig.app.json
We knew that Angular uses typescript as a native language. But the problem here is that browsers do not understand typescript. So, the solution is to transpile typescript code into javascript.
This needs some configuration which will be provided in this file tsconfig.app.json.
/* To learn more about this file see: https://angular.io/config/tsconfig. */
{
  "extends": "./tsconfig.json",
  "compilerOptions": {
    "outDir": "./out-tsc/app",
    "types": []
  },
  "files": [
    "src/main.ts",
    "src/polyfills.ts"
  ],
  "include": [
    "src/**/*.d.ts"
  ]
}
tsconfig.json
tsconfig.json is the file containing global typescript configurations. You may ask yourself why Angular is providing two files doing the same task ( configuring typescript settings, compiling, and transpiling … ).
Well, the answer is tsconfig is more global than tsconfig.app which is used in the application context. Mainly, we use tsconfig.json in the microfrontend context where we can have multiple projects tsconfig will be the global configuration, and each project ( microfrontend ) will have its exacttsconfig.app.json.
/* To learn more about this file see: https://angular.io/config/tsconfig. */
{
  "compileOnSave": false,
  "compilerOptions": {
    "baseUrl": "./",
    "outDir": "./dist/out-tsc",
    "forceConsistentCasingInFileNames": true,
    "strict": true,
    "noImplicitOverride": true,
    "noPropertyAccessFromIndexSignature": true,
    "noImplicitReturns": true,
    "noFallthroughCasesInSwitch": true,
    "sourceMap": true,
    "declaration": false,
    "downlevelIteration": true,
    "experimentalDecorators": true,
    "moduleResolution": "node",
    "importHelpers": true,
    "target": "es2017",
    "module": "es2020",
    "lib": [
      "es2020",
      "dom"
    ]
  },
  "angularCompilerOptions": {
    "enableI18nLegacyMessageIdFormat": false,
    "strictInjectionParameters": true,
    "strictInputAccessModifiers": true,
    "strictTemplates": true
  }
}
Conclusion
This article was a little bit long. However, it covered many things concerning the creation of the Angular project starting from the creation of the project, the commands, its options, and the generated files. Stay tuned for more helpful tutorials.